Managing rental properties sounds simple – until you’re buried under:
- maintenance requests
- late rent payments
- and constant calls from tenants and owners.
For most property managers, the real struggle isn’t finding clients – it’s keeping everything organized and running smoothly across multiple properties.
That’s where GoHighLevel for Property Management comes in.
GoHighLevel is an all-in-one CRM and automation platform that helps property managers streamline operations, automate communication, and manage tenant and owner relationships from one place.
You can:
- track leads
- schedule inspections
- send rent reminders
- manage maintenance follow-ups
- and even collect reviews.
All without switching between tools.
Whether you manage a handful of rentals or a large portfolio, GoHighLevel helps you work smarter, respond faster, and stay in control – so your business grows without adding more chaos.
In this guide, you’ll learn step-by-step how to use GoHighLevel to simplify your property management business, improve tenant satisfaction, and boost profitability.
TL;DR: GoHighLevel for Property Management
If you’re still juggling spreadsheets, calls, and scattered tools to manage your properties, GoHighLevel can transform your workflow.
With GoHighLevel, you can:
- Automate rent reminders, maintenance alerts, and tenant communication.
- Track leads, leases, and payments from one dashboard.
- Manage property owners, tenants, and vendors with a built-in CRM.
- Collect online reviews to boost your agency’s credibility.
- Save time, reduce costs, and improve response speed with automation.
💡 Bottom line: GoHighLevel helps property managers stay organized, deliver better service, and scale their business – without hiring extra staff or paying for multiple tools.
👉 Start your free 30-day GoHighLevel trial and see how easily it can streamline your property management business.
Let’s dive in!
How to Use GoHighLevel for Property Management
Let’s get straight to the point – first, we’ll set up your account, then I’ll walk you through all the strategies you can use.
This is how to set it up:
Step 1: Create HighLevel Account for 30 Days Free
Since you’re just starting with GoHighLevel, you would need to properly set up your account.
And you can do that for free through our exclusive 30-Day Free Trial link here.
In order to start, head over to gohighlevel.com/30-day-free-tial free trial and click on “30 DAY FREE TRIAL” as you can see below.

Upon clicking on “30 DAY FREE TRIAL“, a page will pop that looks exactly like the image below.
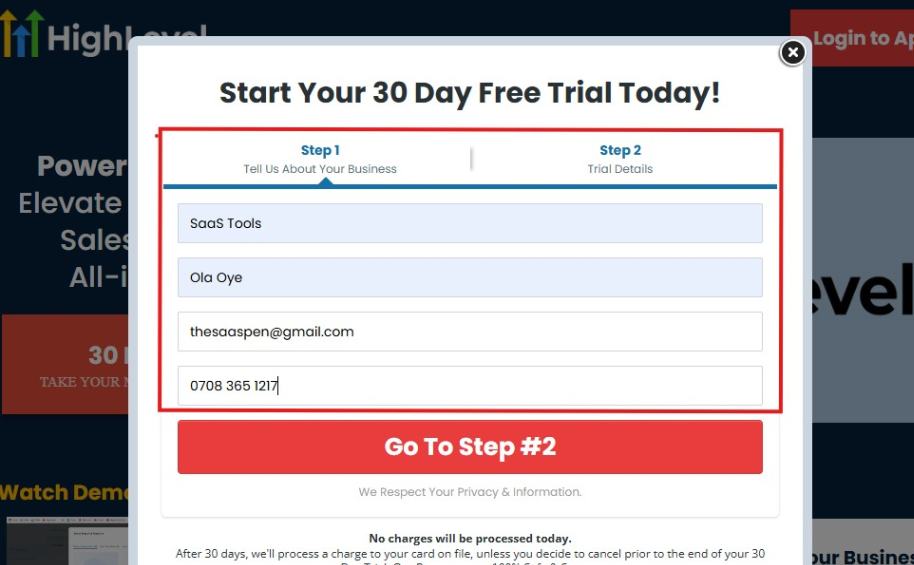
If you take a closer look at the image above, you will see that you need to supply your:
- Business name
- Company name
- Company email
- Phone number
Supply all the pieces of information and click on “Go To Step #2.”
On the next page, you will be required to select the plan you want to opt in for.
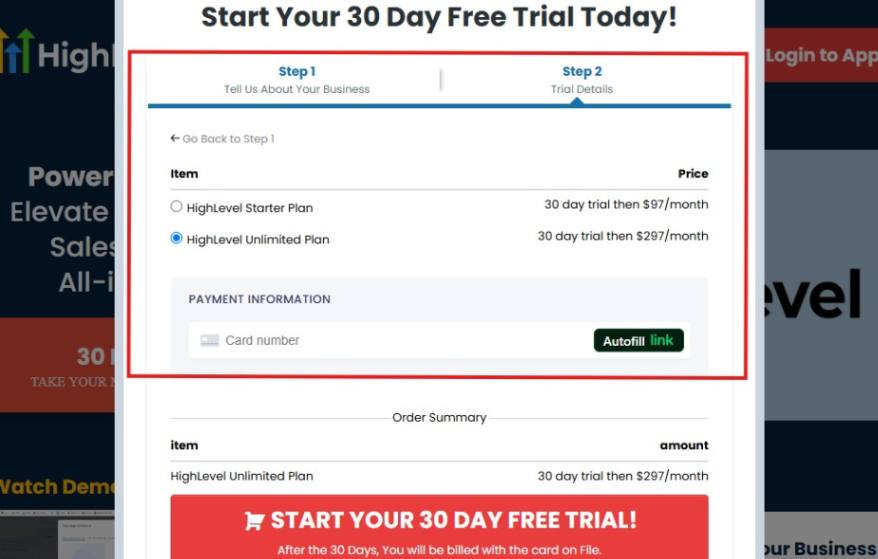
As you can see from the image above, you can either choose from:
- HighLevel Starter Plan
- HighLevel Unlimited Plan
Select the HighLevel Unlimited Plan and continue – you can always upgrade to the SaaS Mode later if you want that or downgrade.
The next thing you want to do is supply your credit card information.
Note: You will not be debited anything today until the end of your trail that is if you don’t cancel. Keep in mind that $1 will be debited and refunded back instantly into your account just to test your card is working.
After you have supplied the information accordingly, click on “START YOUR 30 DAY FREE TRIAL” and you will be asked to confirm you’re not a robot.
After that, the page below will pop up.
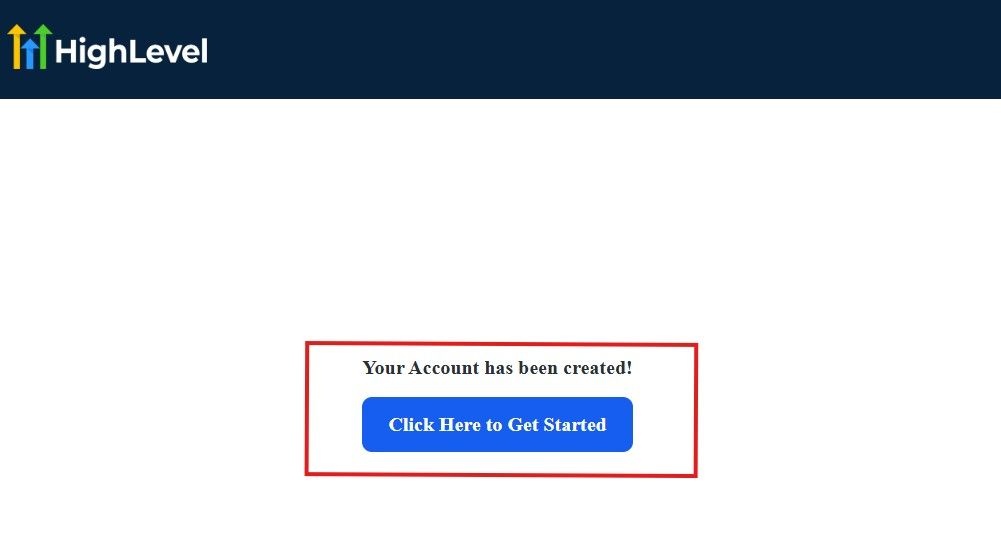
The image above says, “Your Account has been created!” Now, you need to click on the blue button that says “Click Here to Get Started.“
Click on the blue button to start your onboarding process.
Step 2: GoHighLevel Onboarding Process
The onboarding questions help GoHighLevel understand why you have signed up for the platform so that it can tailor your experience accordingly.
This is all you need to do:
After you click on the blue button above, the page below will pop up.
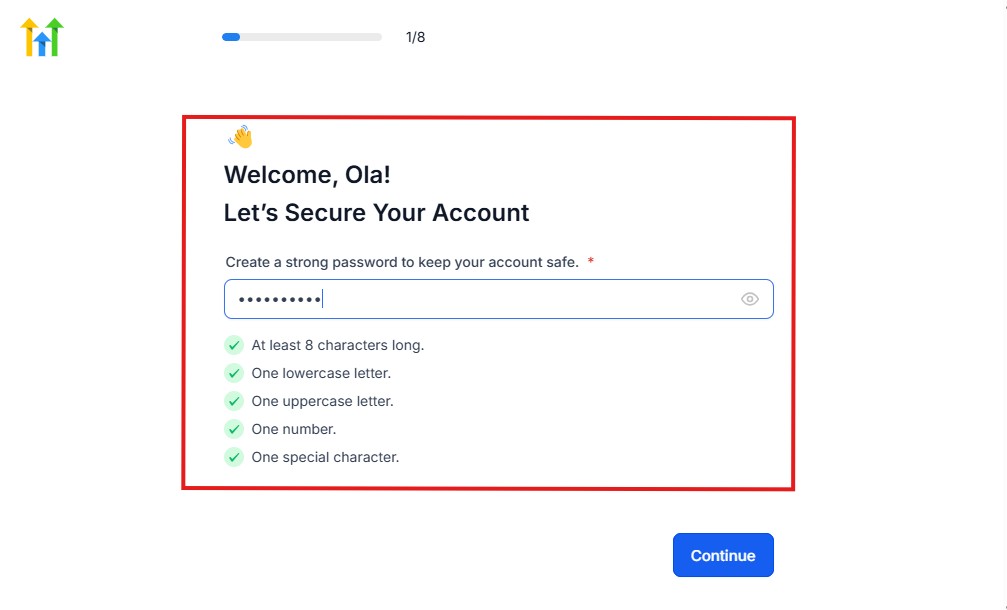
As you can see above, you need to set up your password, and the password has to be:
- At least 8 characters long
- One lowercase letter
- One uppercase letter
- One number
- One special character
If you have input the password and it matches all the description above, everything will be green just the way it’s in the image.
Click on “Continue” there after, and the image below will pop up.
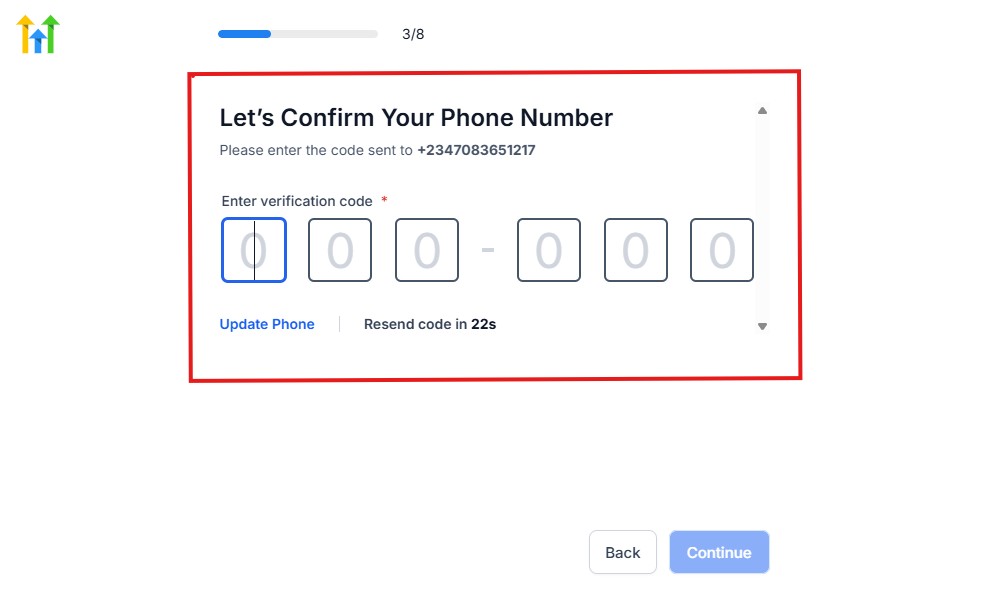
As you can see, a code will be sent to you to confirm your email address and phone number. The process is the same for the 2.
The next thing you need to do is to select how you plan to use GoHighLevel, as you can see below.
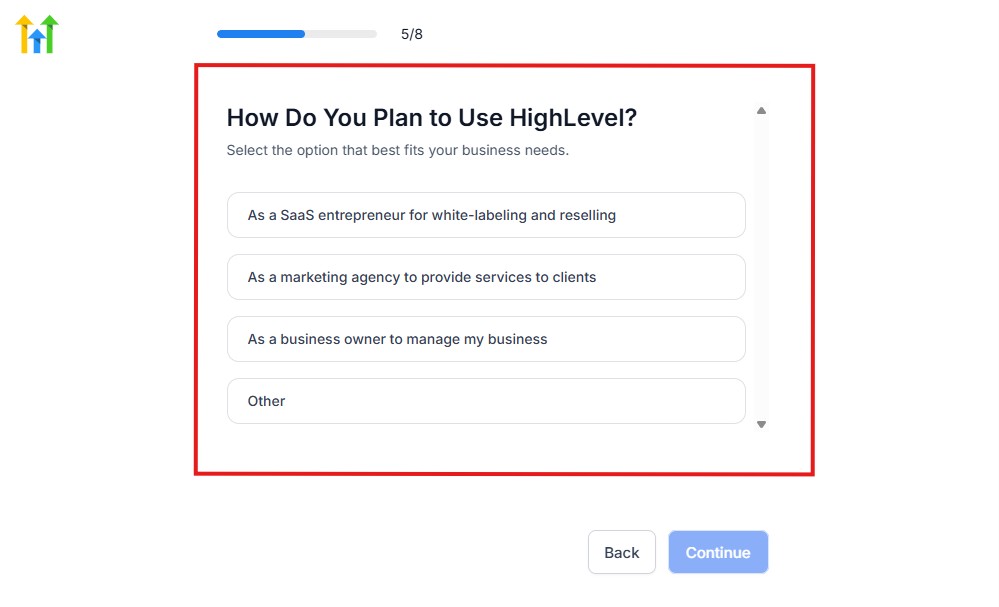
Select what best matches why you have signed up and click on Continue.
On the next page, you will be asked if you plan to resell GoHighLevel or not.
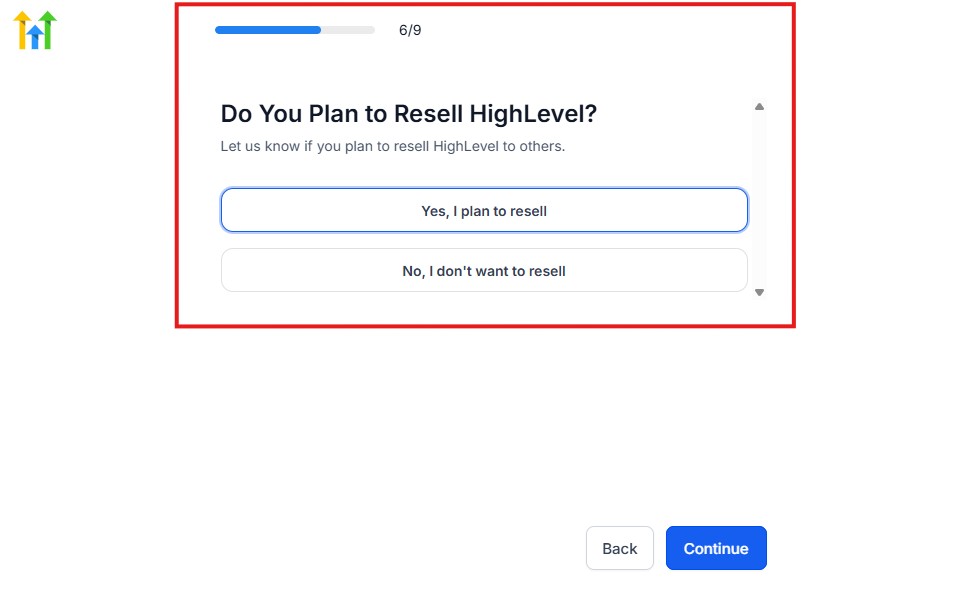
Select the answer based on the reason why you have signed up and click on “Continue”
Then, the page below will pop up.
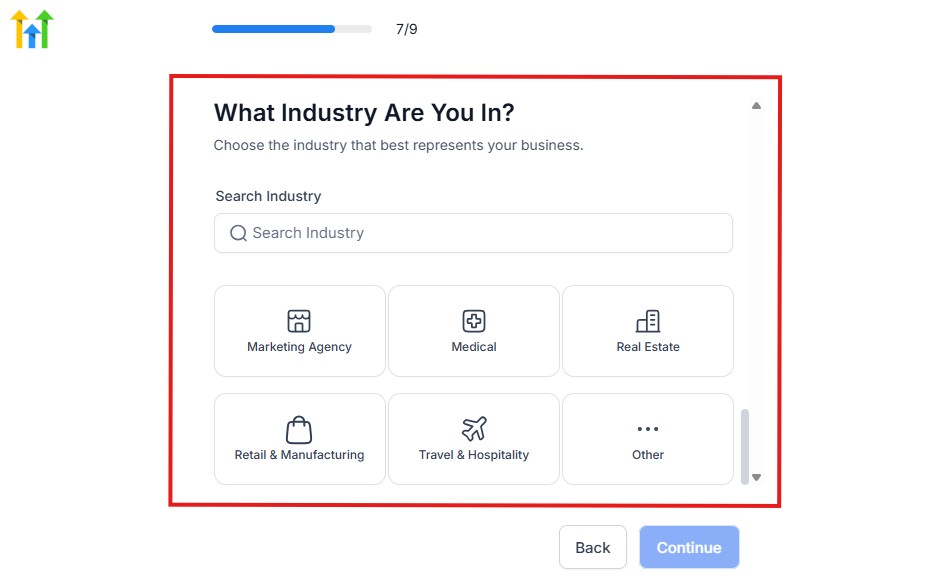
From the image above, you need to select the industry that you fall on. You can also make use of the search button if you can’t find it right away.
Then, click on continue after you select your industry.
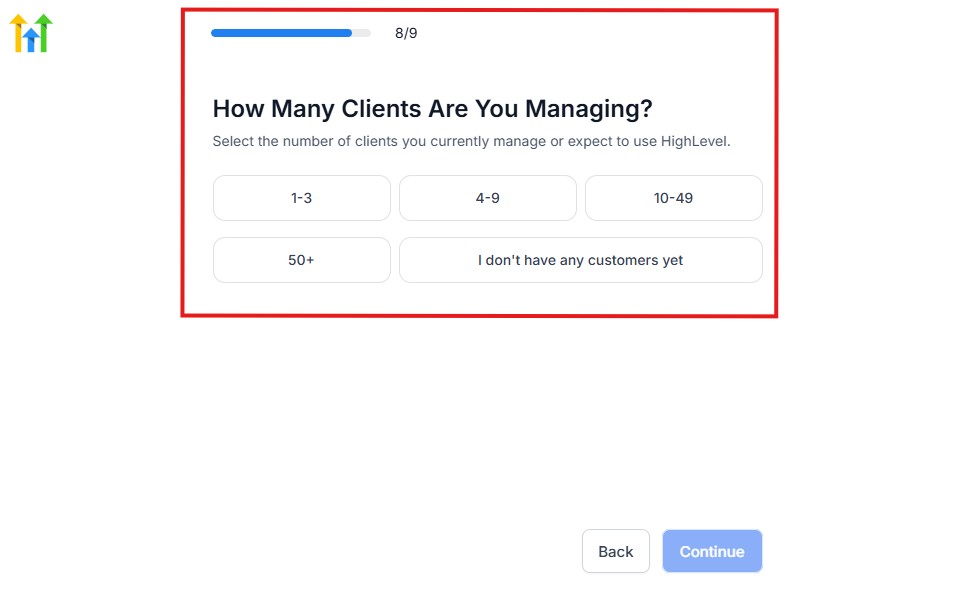
Then, the next thing you need to do is to select the number of clients that you currently have. Select “I don’t have any customers” yet if you currently don’t have one.
On the next page, you will be asked to select the platforms you currently use that you can integrate with GoHighLevel right away.
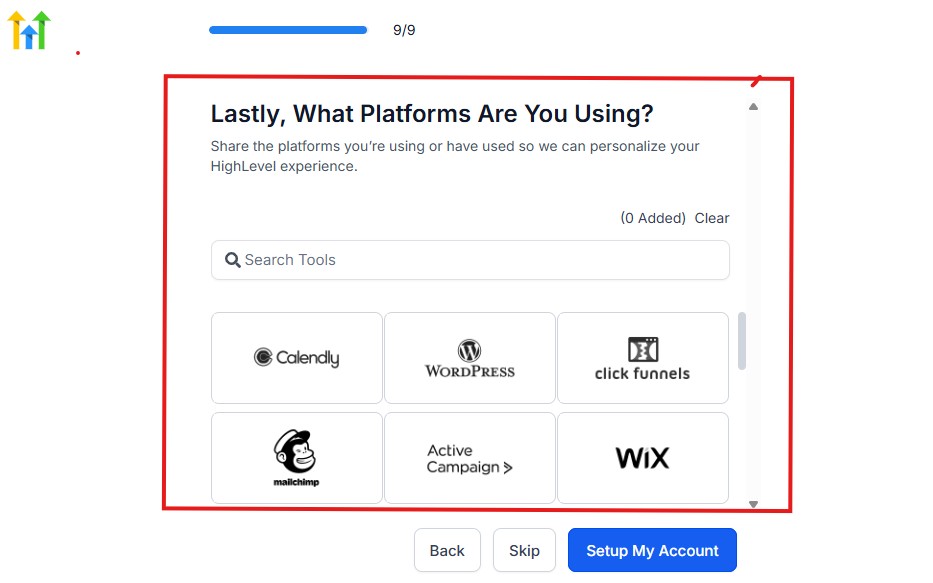
You can use the search button to search for any tools you want to add to your GoHighLevel account.
You can also skip this process and do it later if you want to.
After that, the page below will pop up.
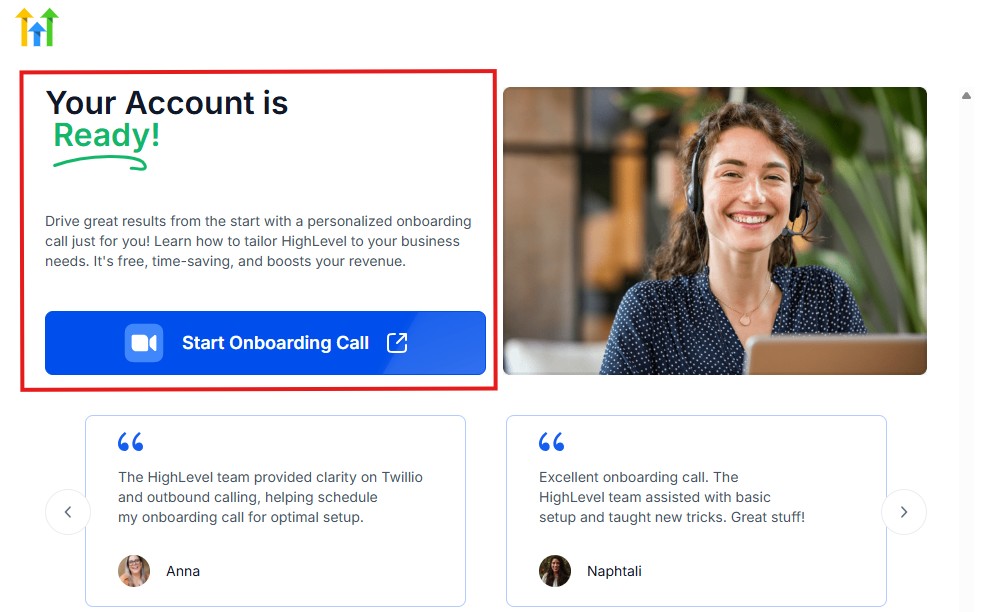
The page above says your account is ready and is asking you to “Start Onboarding Call.”
The “Onboarding Call” allows you to connect with the Go High Level team in order to discuss your account set-up process and everything regarding your plan in using HighLevel.
If you don’t want to start the “Onboarding Call” yet, just stroll down, and you will see the button in the image below.
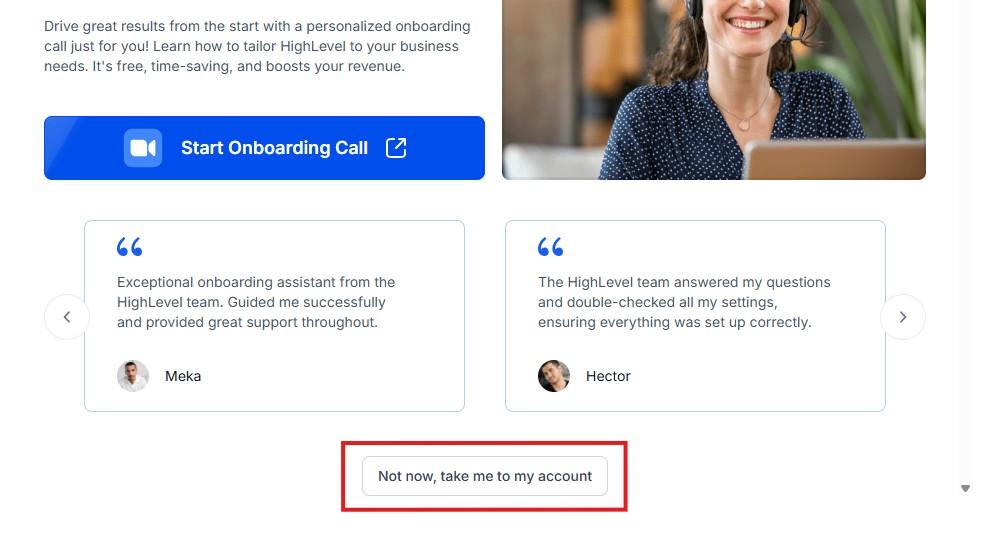
Simply click on “Not now, take me to my account“, and you will have access to your dashboard.
Note: If you have indicated that you want to resell HighLevel, you would have access to the agency dashboard by default, which looks like the image below.
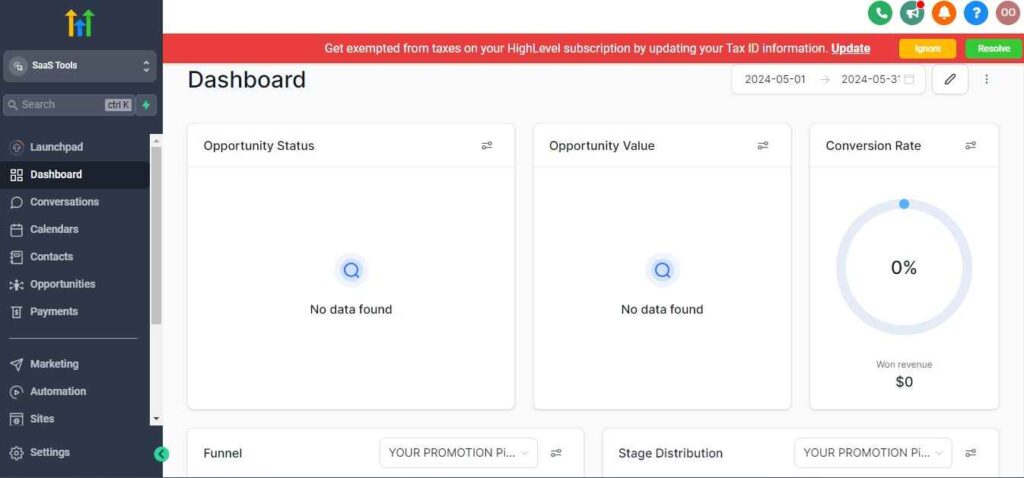
But if you didn’t indicate interest in reselling GHL, your dashboard will look like the image below.

You can switch between these dashboards at any time.
The data you see on the dashboard above are not real data, they’re snapshots that you can use to kickstart your account setup process.
I want to say congratulations. You have successfully set up your Go High Level account.
🧭 Step 3: Get Familiar with the GoHighLevel Dashboard
Once your account is active, spend some time exploring the main dashboard. Here’s what you’ll find:
- Launchpad: Quick setup for integrations like Google, Facebook, Stripe
- CRM: Where your contacts, leads, and tenants live
- Workflows: Automation hub for communication and processes
- Funnels & Websites: Lead capture pages and listing templates
- Calendars: Tour scheduling and appointment management
- Conversations: Unified inbox for SMS, email, social DMs
- Reporting: Track lead sources, appointments, and conversions
👀 Think of it as your command center – where marketing, communication, and operations converge.
🧱 Step 4: Set Up a Sub-Account for Each Property (Optional But Powerful)
If you’re managing multiple properties, you’ll want to set up sub-accounts within GoHighLevel. Each sub-account can have its own:
- CRM database
- Custom workflows
- Funnels and landing pages
- Calendar settings
- Automated follow-ups
- Branding and domain
This helps you keep things organized, separate data by property or client, and delegate access to your team with the right permissions.
🛠️ How to create a sub-account:
- Go to your Agency dashboard
- Click “Accounts” > “Create Account”
- Choose the pre-built industry snapshot (or use a custom one you’ve made)
- Name it based on the property or owner (e.g., Main Street Apartments)
🔗 Step 5: Connect Key Integrations
To fully automate your property management workflows, you’ll need to integrate a few external tools:
- Google Account – For calendar syncing and email sending
- Facebook & Instagram – For lead capture from ads
- Stripe or PayPal – For collecting rent payments or deposits
- Phone Number (Twilio) – To send/receive SMS and voicemail drops
- Zapier or Make – For connecting other real estate tools like AppFolio, QuickBooks, or Google Sheets
📌 Don’t skip this step – integrations are what make GHL a powerful all-in-one system.
👥 Step 6: Set Up Team Members and Permissions
If you have a team (e.g., leasing agents, maintenance coordinators, VAs), you can assign them roles with different access levels. This keeps sensitive data secure while enabling collaboration.
- Admin – Full access to everything
- User – Can access only what you assign (e.g., calendar, conversations)
- Restricted – Useful for maintenance teams or assistants
🎯 Example:
- Give your leasing agent access to the CRM, calendar, and conversations
- Give your maintenance coordinator access to tickets and forms only
🧩 Step 7: Prepare Your Assets
Before jumping into funnels and automations, make sure you have the following ready:
- Property listing information (descriptions, photos, pricing)
- Lease agreement templates (PDFs or e-sign documents)
- Maintenance request form details
- SMS and email scripts for communication
- Branding assets (logos, colors, domain name)
These will plug directly into your workflows, emails, and funnels – making setup much faster later on.
✅ Quick Checklist Recap
| Task | Done? |
|---|---|
| Choose your GoHighLevel plan | ⬜ |
| Explore the GHL dashboard | ⬜ |
| Create sub-accounts for properties | ⬜ |
| Connect email, calendar, SMS, Stripe | ⬜ |
| Add team members & assign roles | ⬜ |
| Prepare assets for automation | ⬜ |
With your account set up and structured for property management, you’re now ready to build your CRM system – the beating heart of your operation.
Building Your CRM for Property Management
If you want to scale your property management business efficiently, you need a CRM (Customer Relationship Management) system that works with you – not against you.
GoHighLevel’s CRM isn’t just a contact list – it’s a dynamic engine that lets you track leads, automate follow-ups, manage tenants, communicate with vendors, and keep your entire operation running smoothly.
Let’s walk through how to set up a custom CRM tailored for property management.
🧩 Step 1: Define the Stages of Your Property Management Pipeline
First, think of your rental or tenant journey as a pipeline – from first inquiry to long-term lease (or even renewal).
Here’s an example of a simple rental pipeline:
- 📥 New Lead – Someone fills out a contact form or calls
- 👀 Pre-Qualified – You’ve screened them or they passed a survey
- 🗓️ Tour Scheduled – Appointment confirmed for a showing
- 📝 Application Submitted – They’ve submitted docs or applied
- ✅ Approved – You’ve approved their application
- ✍️ Lease Signed – Lease signed and deposit paid
- 🏡 Tenant Active – Tenant has moved in
- 🔄 Renewal / Exit – End of lease cycle
👉 You can customize this pipeline in GoHighLevel under “Opportunities > Pipelines.”
Each stage becomes a visual column where you can drag and drop leads/tenants as they move through the process.
🎯 Pro Tip: You can create multiple pipelines:
- One for tenant acquisition
- One for maintenance request management
- One for lease renewals
👥 Step 2: Organize Contacts (Leads, Tenants, Owners, Vendors)
In GoHighLevel, every person or business you interact with becomes a Contact. You can manage:
- 🏘️ Rental leads (potential tenants)
- 👤 Current tenants
- 🧑💼 Property owners or landlords (if you’re an agency)
- 🔧 Service vendors (plumbers, electricians, etc.)
Use custom fields and tags to categorize them.
✅ Examples of useful tags:
Lead-RentalTenant-ActiveTenant-PastDueLandlord-JohnSmithVendor-Plumbing
✅ Custom fields you might add:
- Lease start/end date
- Monthly rent amount
- Preferred contact method
- Property unit number
- Application status
You can create and manage these in Settings > Custom Fields.
🎯 Pro Tip: Use Smart Lists to filter your contacts by role, location, payment status, or lease timeline.
🔁 Step 3: Automate Movement Through the Pipeline
Once your pipeline and CRM fields are in place, automate the process with Workflows. For example:
- When a contact submits a rental application form, move them to the “Application Submitted” stage
- If their application is approved, trigger a welcome SMS and move them to “Approved”
- When a lease is signed via integrated e-signature (e.g., PandaDoc, DocuSign), push them to “Tenant Active”
This way, you’re not manually dragging cards or sending emails — the system does it for you.
📌 Workflow Example:
yamlCopyEditTrigger: Form Submission (Rental Application)
↓
Action: Move Opportunity to “Application Submitted”
↓
Action: Notify leasing agent via SMS or email
↓
Action: Send confirmation to applicant with next steps
🔍 Step 4: Track Tenant & Lead History
Each contact record in GoHighLevel gives you a full communication timeline:
- Emails
- SMS
- Phone calls (recorded, if enabled)
- Form submissions
- Notes and internal team comments
💡 Example: You can pull up a tenant’s record and instantly see:
- When they moved in
- Any past maintenance requests
- Communication threads
- Payment reminders sent
This is incredibly helpful during disputes or move-out processes – everything is logged and centralized.
📋 Step 5: Use Notes, Tasks & Mentions for Team Collaboration
Use Notes inside each contact’s profile to log conversations, special instructions, or reminders.
You can also:
- Assign Tasks to team members with due dates
- Use
@mentionsin notes to notify a teammate (e.g., @leasing-agent)
👥 Example:
“@maintenance-team – Tenant reports a leak in Unit 3B. Please check ASAP.”
It keeps everyone on the same page, without the need for back-and-forth emails.
📈 Step 6: Analyze Your CRM Performance
Once your CRM is in motion, GoHighLevel lets you track performance across the pipeline:
- Lead-to-lease conversion rate
- Average time per pipeline stage
- Sources of your best leads (Facebook Ads, Google, referrals)
- How long tenants stay in each stage
You’ll find this data under Opportunities > Reports, and it’s invaluable for optimizing your leasing process.
🚀 Bonus Tip: Clone Pipelines & Automations for New Properties
Once you’ve created one property’s CRM pipeline and automation flow, you can save it as a “Snapshot.”
Then, for a new property or client, just:
- Create a new sub-account
- Load your snapshot
- Customize property-specific details
This saves hours of setup time and ensures consistency across your entire portfolio.
✅ Recap: CRM Setup Essentials
| Feature | Purpose |
|---|---|
| Pipelines | Visualize and manage lead-to-tenant journey |
| Tags & Fields | Organize leads, tenants, vendors, and more |
| Workflows | Automate movement and communication |
| Notes & Tasks | Enable team collaboration |
| Reports | Analyze performance and optimize processes |
You’ve now built a CRM system designed for modern property management.
GoHighLevel for Property Management – Automating Lead Generation & Follow-Up
Let’s face it – every minute you spend manually replying to rental inquiries or chasing leads is time you could be using to manage properties, close leases, or scale your business.
With GoHighLevel (GHL), you can automate your entire lead generation and follow-up process, so no opportunity slips through the cracks – and your leads are nurtured from first click to signed lease on autopilot. 📈
In this section, you’ll learn how to set up lead capture funnels, create automated follow-up sequences, and even use AI chatbots to respond to inquiries 24/7.
🏠 Step 1: Create a Lead Capture Funnel for Property Listings
Every rental property you manage is an opportunity to generate leads.
With GoHighLevel’s Funnel Builder, you can quickly create high-converting landing pages to showcase your listings.
✅ What to include in a lead capture funnel:
- Property title + images
- Rent price, features, and location
- Embedded video tour (if available)
- Contact form (Name, Email, Phone, Desired Move-In Date)
- Call-to-action: “Schedule a Tour” or “Apply Now”
📌 Example Funnel Flow:
- Landing Page: Highlights the property with images, pricing, and key features
- Form Submission Page: Captures lead info
- Thank You Page: Confirms submission + offers to schedule a tour or chat with a leasing agent
🎯 You can build this in Sites > Funnels and clone it for every property in your portfolio.
🤖 Step 2: Use Workflows to Automate Follow-Up Sequences
Once a lead submits your form, it’s time to automatically engage and qualify them.
Set up a Workflow in GoHighLevel to:
- Send a confirmation text and email
- Notify your leasing team
- Trigger an internal task to review the lead
- Move the contact into your CRM pipeline
✅ Example Workflow: New Rental Inquiry
yamlCopyEditTrigger: Form Submitted on Property Page
↓
Action: Send SMS – “Thanks for your interest in 123 Main St! When would you like to tour?”
↓
Action: Send Email – with property details, floorplan PDF, and virtual tour link
↓
Action: Notify leasing agent via email or Slack
↓
Action: Add Tag – Lead-Rental
↓
Action: Create Opportunity in ‘New Lead’ stage
This is where the real power of GHL kicks in: Your system nurtures leads instantly, and your team only steps in when needed.
💬 Step 3: Implement an AI Chatbot for Instant Inquiries
Many rental leads want instant answers – especially outside business hours. GoHighLevel’s AI Agent (aka Chatbot) can handle basic questions, book appointments, and even qualify leads for you.
💡 What your AI bot can handle:
- Rental availability
- Pricing and lease terms
- Booking a showing
- Answering FAQs (e.g., pet policy, utilities included, etc.)
🎯 Example:
Lead: “Is the unit at 456 Elm Street still available?” AI Bot: “Yes, the 2-bed unit is currently available. Would you like to book a tour?”
You can train your AI Agent by feeding it property details and typical FAQs via AI Prompts + Workflow triggers.
📅 Step 4: Let Leads Book Showings Automatically
Connect GHL’s Calendar feature so leads can book a tour directly from your funnel, chatbot, or email.
- Sync with Google Calendar
- Set team availability and tour slots
- Automate confirmations and reminders (SMS & email)
- Reduce no-shows with day-before and hour-before reminders
📌 Add your calendar to your website or link it in follow-up messages:
“Want to tour this unit? 📅 [Book a showing here]”
This removes friction and gives leads immediate control over the process – something they’ll love.
📬 Step 5: Nurture Cold Leads Automatically
Not every lead is ready to move in today. But many will be in the future – and GoHighLevel makes sure they don’t forget you.
Set up nurture sequences (email + SMS drip campaigns) for leads who:
- Didn’t schedule a tour
- Ghosted after a tour
- Applied but didn’t sign
✅ Nurture Workflow Example:
- Day 1: “Still looking for a new place? Here’s a few other units we have available.”
- Day 3: Share a virtual tour or testimonial from another happy tenant
- Day 7: “Spots are filling up fast – don’t miss out on 123 Main St!”
🎯 Pro Tip: Use conditional logic to stop the campaign if they convert – no one likes to be spammed after signing a lease.
🔌 Step 6: Track Your Lead Sources & Conversions
Inside GoHighLevel’s Reporting Dashboard, you can track:
- Where your leads came from (Google, Facebook Ads, referrals, etc.)
- How many booked a tour
- How many signed a lease
- Conversion rates per property or campaign
This lets you double down on what’s working and eliminate what’s not – all without guessing.
✅ Recap: Automate Your Lead Flow Like a Pro
| Task | Purpose |
|---|---|
| Build Funnels | Capture high-intent rental leads |
| Set Up Workflows | Engage leads instantly via SMS & email |
| Add AI Chatbot | Handle inquiries 24/7 |
| Use Calendars | Let leads self-schedule showings |
| Create Nurture Sequences | Stay top-of-mind with cold leads |
| Track Results | Optimize campaigns for better ROI |
With automated lead gen and follow-up in place, your pipeline stays full – without overwhelming your team.
Booking & Scheduling Property Tours
Property tours are one of the most critical steps in the rental journey. But managing back-and-forth messages, no-shows, or double bookings can eat up your time and energy.
GoHighLevel simplifies this entire process by allowing prospects to schedule tours online, sending automatic confirmations and reminders, and even screening leads before you ever meet them.
This section will show you exactly how to set up a hands-free, efficient tour scheduling system that works while you sleep.
📅 Step 1: Create a Calendar for Property Showings
Start by setting up a Calendar inside GoHighLevel for each property or leasing agent.
Here’s how:
Go to Settings > Calendars
Click “Create Calendar Group” – Name it after the property (e.g., Main Street Apartments Tours)
Add a calendar under that group with:
- Available time slots for showings
- Buffer time between appointments (e.g., 15–30 min)
- Maximum number of bookings per day
- Your team’s availability (sync with Google Calendar)
🎯 Pro Tip: If you’re managing multiple properties or agents, set up one calendar per property or assign calendars to specific leasing team members.
✍️ Step 2: Embed Pre-Screening Questions into Your Booking Form
Not every lead is qualified to rent – save time by gathering info before the tour is scheduled.
GoHighLevel allows you to customize the form shown during booking. Add fields such as:
- Desired move-in date
- Monthly income range
- Pets? (Y/N)
- Credit score estimate
- How soon are you looking to move?
- Have you been evicted before?
📌 Add disqualifying logic in your workflows (e.g., if credit score < 500, send an alternate message instead of allowing booking).
💡 Example:
“Thanks for your interest! Unfortunately, this unit requires a minimum credit score of 600. Would you like us to send alternative listings that might be a better fit?”
🔄 Step 3: Automate Confirmation & Reminder Messages
Once a tour is booked, GoHighLevel can send automated confirmations and reminders via SMS and email.
✅ Your confirmation message might include:
- Date and time of the tour
- Property address
- Parking instructions
- What documents to bring (ID, proof of income)
✅ Reminder messages can go out:
- 24 hours before
- 2 hours before
- 15 minutes before
📌 Add a cancellation/reschedule link to reduce no-shows and make the process smooth for prospects.
🎯 Example SMS:
“Hi Sarah! Just a reminder about your tour at 123 Main St tomorrow at 3 PM. Need to reschedule? Click here: [link]”
📊 Step 4: Track No-Shows & Attendance
Inside your Calendar dashboard, GoHighLevel logs:
- Who showed up
- Who canceled or rescheduled
- Who didn’t show up
You can tag contacts automatically based on outcomes:
Tour-CompletedTour-NoShowTour-Canceled
This is great for:
- Re-engaging cold leads with targeted follow-up
- Tracking agent performance
- Prioritizing high-intent prospects
💡 Use conditional workflows to send a follow-up like:
“Sorry we missed you at today’s tour. Would you like to reschedule?”
🔄 Step 5: Link Calendar to Funnel, Chatbot & Email Sequences
Once your calendar is ready, embed it or link it in:
- Your listing funnels (e.g., “Schedule a Tour Now” button)
- AI Chatbot conversations (e.g., “Want to book a tour?” → drop calendar link)
- Email/SMS sequences (e.g., “Ready to tour? Grab a time that works for you”)
This creates a seamless experience for leads, from inquiry to scheduled showing — with minimal involvement from your team.
📌 Tip: Use dynamic links like {{ contact.first_name }}, click here to book: [calendar URL] in messages for a personal touch.
🧠 Bonus: Add AI Assistant to Qualify and Schedule Automatically
Combine your AI Chatbot + Calendar + Screening workflow for a truly hands-off process.
Here’s how it flows:
- Lead lands on funnel or sends message
- AI Agent responds and asks screening questions
- If qualified, bot drops the tour calendar link
- Contact books a time
- GHL sends confirmation/reminders automatically
🎯 This setup works 24/7 – so you’re capturing and booking leads even while you sleep.
✅ Recap: Tour Scheduling System Checklist
| Feature | Purpose |
|---|---|
| Custom Calendars | Let leads self-book showings |
| Screening Questions | Filter unqualified prospects |
| Automated Messages | Reduce no-shows and confusion |
| No-Show Tracking | Improve lead follow-up |
| Calendar Embeds | Connect everywhere your leads are |
| AI Booking Assistant | Automate everything from A to Z |
By streamlining your tour scheduling process, you save time, reduce friction, and improve your conversion rates – all while delivering a better experience for your future tenants.
Automating Tenant Onboarding & Lease Signing
You’ve done the hard work – the prospect scheduled a tour, showed up, and they’re ready to move in.
Now it’s time to close the loop efficiently with a smooth, automated tenant onboarding process.
With GoHighLevel, you can digitize and streamline everything from lease signing to move-in instructions, so nothing falls through the cracks – and your new tenants feel confident, welcomed, and informed. 🙌
🔗 Step 1: Integrate Your E-Signature Tool
GoHighLevel doesn’t natively support e-signatures, but it integrates seamlessly with platforms like:
- PandaDoc
- DocuSign
- HelloSign
You can connect your preferred tool via Zapier or native integrations (if available) and trigger a lease to be sent automatically.
✅ Workflow Example:
yamlCopyEditTrigger: Opportunity moved to “Application Approved”
↓
Action: Send contact info to PandaDoc (or trigger via Zapier)
↓
Action: Lease agreement template auto-filled and sent
↓
Action: Wait until lease is signed
↓
Action: Move opportunity to “Lease Signed”
↓
Action: Send welcome email/SMS with move-in instructions
🎯 Pro Tip: Use contact custom fields like Move-in Date, Monthly Rent, and Lease Term to auto-fill documents for faster prep.
📥 Step 2: Send a Tenant Onboarding Welcome Sequence
Once the lease is signed, it’s time to make your new tenant feel at home. 🏡
Use automated Workflows to send a welcome sequence with everything they need before move-in day.
✅ What to include in your onboarding sequence:
- Welcome Email with a summary of next steps
- Move-in checklist (PDF or link)
- Contact info for leasing and maintenance
- Link to tenant portal or payment system
- How-to guides (e.g., how to request maintenance, pay rent, etc.)
- Calendar reminder for move-in day
📌 Example SMS:
“Welcome aboard, Jasmine! 🎉 Your lease for 456 Elm St is signed. We’ve sent you a move-in checklist and what to expect next.”
🎯 Use GoHighLevel’s email builder or attach PDFs/files through third-party links (like Google Drive or Dropbox).
🧠 Step 3: Use Workflows to Manage Exceptions & Admin Tasks
Need to assign tasks to your team when a lease is signed? GHL can automate that too.
✅ Example internal task automation:
- Assign a task to the leasing agent: “Prepare welcome folder”
- Assign to maintenance: “Inspect unit before move-in”
- Notify property manager: “Lease signed – schedule key handoff”
You can do all of this in the Workflows builder, with task creation, user notifications, and due dates.
🎯 Add @mentions in Notes to loop in specific teammates instantly.
📊 Step 4: Track Lease Status Inside Your CRM Pipeline
As part of your CRM pipeline (covered in Section III), you should have stages like:
- Application Submitted
- Approved
- Lease Sent
- Lease Signed
- Tenant Active
Use automation to move contacts between these stages based on triggers, such as:
- Lease document status (via Zapier/API)
- Tags added (e.g.,
Lease-Signed) - Manual confirmation by staff
This gives you full visibility into every applicant’s journey, and you’ll never forget who still needs to sign.
📂 Step 5: Store Lease Agreements & Attachments in Contact Profiles
Although GHL doesn’t have traditional file storage, you can store lease links, PDFs, or file URLs inside the contact record using:
- Custom fields (e.g., “Lease PDF Link”)
- Notes with the file URL
- Tags (e.g.,
Lease-Signed-April2025)
📌 Example:
Add a note to the contact: “Lease signed via DocuSign on April 10 – View PDF”
This keeps everything centralized and accessible during renewals, disputes, or audits.
💡 Bonus: Trigger Tenant Portal Account Setup
If you use a separate tenant portal (e.g., Buildium, AppFolio, or custom portals), you can send automated onboarding instructions with login links and setup guides.
✅ Workflow Action:
- “Wait until lease is signed”
- → “Send email: Tenant Portal Setup Instructions”
- → “Add tag: Portal-Sent”
You could even embed a portal explainer video using GoHighLevel’s email builder or landing page tool.
✅ Recap: Automating Onboarding & Lease Signing
| Feature | Purpose |
|---|---|
| E-signature Integration | Send & sign leases automatically |
| Welcome Sequence | Guide tenants through move-in prep |
| Team Task Automation | Notify staff and assign next steps |
| CRM Tracking | Visualize lease progress in pipeline |
| Document Storage | Keep lease records tied to tenant profile |
| Portal Setup Automation | Onboard tenants into external systems |
By automating your tenant onboarding and lease signing process, you not only save time and eliminate manual errors, but you also create a professional, consistent experience that impresses tenants and owners alike.
Managing Maintenance Requests & Service Coordination
Property management isn’t just about filling units – it’s about keeping tenants happy and properties in top shape.
Whether it’s a leaky faucet, broken A/C, or pest issue, how you handle maintenance directly impacts tenant satisfaction, retention, and even online reviews.
With GoHighLevel, you can centralize maintenance requests, automate communication, and streamline coordination with your vendors or internal maintenance team – all without juggling spreadsheets or endless phone calls. 🙌
Let’s walk through how to set this up from A to Z.
🧾 Step 1: Create a Maintenance Request Form
Start by building a custom form in GoHighLevel that tenants can use to report maintenance issues.
📍Go to: Sites > Forms > Create New Form
✅ Include fields like:
- Tenant Name
- Property Address or Unit #
- Contact Info (Phone/Email)
- Description of Issue
- Upload Photos (optional but highly recommended)
- Urgency Level (Low, Medium, Emergency)
- Preferred Access Time
🎯 Pro Tip: You can also embed this form inside your tenant portal, email sequences, or include it on your “Submit Maintenance Request” landing page built in GHL.
🔁 Step 2: Build a Maintenance Workflow Automation
Once a form is submitted, it should trigger a Workflow that handles everything – from notifying your team to updating the tenant.
📍 Go to: Automation > Workflows > Create New Workflow
✅ Example Workflow: New Maintenance Request
yamlCopyEditTrigger: Form Submission – "Maintenance Request Form"
↓
Action: Create Internal Task – "Review maintenance request from [Tenant Name]"
↓
Action: Send Notification to Maintenance Manager or Team
↓
Action: Tag Contact – "Maintenance-Requested"
↓
Action: Send Email/SMS to Tenant – “We’ve received your request and are reviewing it.”
↓
Action: Create Opportunity in “Maintenance Requests” Pipeline
You can customize this further by routing different types of issues to different team members or vendors.
🧑🔧 Step 3: Assign the Request to the Right Vendor or Team Member
Use task assignments or even create custom workflows based on the category of the issue:
✅ Example:
- Plumbing → Assign to internal technician or external plumber
- Electrical → Notify your preferred electrician
- Pest Control → Trigger email to 3rd-party pest control provider
🎯 Use Custom Fields like “Issue Type” or “Assigned Vendor” to track who’s responsible.
📌 Pro Tip: You can automate emails to vendors with the issue details + tenant info using dynamic variables in GHL (e.g., {{contact.address}}, {{custom.issue_description}}).
📊 Step 4: Track Maintenance Requests in a Dedicated CRM Pipeline
Create a separate CRM Pipeline just for maintenance so you can track issues like a ticketing system.
📍 Go to: Opportunities > Pipelines > New Pipeline
📌 Sample Stages:
- New Request
- In Review
- Assigned to Vendor
- In Progress
- Completed
- Follow-Up Required
Each maintenance request can be treated like a mini-ticket that moves through this pipeline – giving you and your team visibility at all times.
📱 Step 5: Keep Tenants in the Loop Automatically
The #1 frustration tenants report? Lack of communication.
Use GoHighLevel to send automated status updates based on the pipeline stage or internal task completion.
✅ Examples:
- “Your request is now assigned to [Vendor Name] and scheduled for [Date].”
- “Maintenance was completed today – let us know if the issue is resolved.”
🎯 Bonus: Create a feedback form or quick survey link that gets triggered once a task is marked completed. It helps you gauge tenant satisfaction.
🔁 Step 6: Recurring & Preventive Maintenance Reminders
Don’t wait for problems to arise – automate reminders for preventive tasks like:
- HVAC servicing
- Gutter cleaning
- Annual inspections
- Smoke detector checks
📍 Create a recurring Workflow:
- Trigger: Custom date or fixed interval
- Action: Notify internal team or vendor
- Optional: Notify tenant of scheduled visit
🎯 Use tags and custom fields to track when each property had its last service.
🔒 Step 7: Document Everything for Accountability
Keep all communications, forms, images, and status updates within the tenant’s contact profile in GHL.
✅ Best practices:
- Add notes for completed service
- Store file links (invoices, photos, inspection reports)
- Use tags like
Maintenance-Completed,AnnualInspection-2025
This creates an audit trail and ensures your team has full context for every unit – essential when handling disputes or owner reports.
✅ Recap: End-to-End Maintenance Automation
| Feature | Purpose |
|---|---|
| Custom Form | Capture detailed maintenance requests |
| Workflow Automation | Route issues and notify stakeholders |
| Task Assignment | Get vendors or staff involved instantly |
| Pipeline Tracking | Manage progress like a ticket system |
| Status Updates | Keep tenants informed every step of the way |
| Preventive Workflows | Stay proactive, not reactive |
| Contact Notes & Tags | Centralize history for each tenant/property |
By using GoHighLevel to handle maintenance and service coordination, you save hours of manual work, reduce tenant complaints, and create a proactive, organized system that scales with your property portfolio.
Rent Collection Reminders & Payment Integration
Rent collection can be one of the most frustrating and time-consuming parts of property management – especially when done manually. Missed payments, forgetful tenants, and constant follow-ups? No thanks.
With GoHighLevel, you can automate rent reminders, send secure payment links, and even integrate with third-party tools to make rent collection seamless and reliable – for both you and your tenants.
Let’s walk through how to set this up to make rent day… just another day. 📆
🧾 Step 1: Choose Your Rent Payment Platform
First, you need a payment processor to actually collect rent. GoHighLevel doesn’t act as a payment gateway, but it integrates beautifully with third-party tools like:
- Stripe (native GHL integration)
- PayPal (via link/embed)
- QuickBooks Payments
- Buildium, AppFolio, or other full-featured PM platforms (via Zapier or links)
- ACH portals or bank payment links
🎯 For a streamlined GHL setup, we recommend Stripe + GHL payment pages for rent collection.
🔗 Step 2: Create a Branded Rent Payment Page
Use GoHighLevel’s Funnel Builder or Websites to create a secure rent payment page.
📍 Go to: Sites > Funnels > New Funnel
✅ Your rent page should include:
- Property name/logo
- Tenant name field (or email autofill)
- Payment amount field (optional or pre-filled)
- Unit number or lease reference
- Stripe Payment element (for credit card payments)
- Note: Add info for ACH or bank transfer if applicable
🎯 Pro Tip: Use dynamic links in your reminders like {{ contact.full_name }}, your rent is due. Pay here: [custom payment page link].
🔁 Step 3: Set Up Automated Rent Reminder Workflows
Use GHL Workflows to automatically send reminder messages before, on, and after the due date.
📍 Go to: Automation > Workflows > Create New
🎯 Track payment manually, or use Zapier to listen for payment confirmations from Stripe or your payment tool.
📱 Step 4: Offer Multi-Channel Reminders (SMS, Email, Voicemail)
Tenants miss emails. SMS is gold. Add multi-touch reminders across:
- Text messages (quick and direct)
- Email (for invoices or receipts)
- Voicemail drops (optional, but effective)
✅ Example Reminder Timeline:
- 3 days before due: Email
- 1 day before: SMS + email
- Day of: SMS reminder
- 3 days late: Voicemail drop + email
- 7 days late: Final warning SMS with late fee notice
🎯 BONUS: Include links to your late fee policy, FAQs, or contact form for quick dispute resolution.
🏷️ Step 5: Tag & Track Who Has Paid (and Who Hasn’t)
Use Tags and Custom Fields to track rent status for each tenant.
✅ Sample Tags:
Rent-Due-AprilRent-Paid-AprilLate-AprilNo-Response-April
You can manually add tags or automate them with Zapier (if your payment system supports it).
📌 Use these tags to trigger different follow-ups, such as:
- “Thanks for paying!”
- “We still haven’t received your rent…”
📊 Step 6: Build a Rent Status Dashboard with GHL Pipelines
You can also create a Pipeline inside GHL to visually manage rent collection by status:
📍 Go to: Opportunities > Pipelines
✅ Example Stages:
- Rent Due
- Paid On Time
- Late – 1st Warning
- Late – Final Warning
- Payment Plan Setup
- Paid with Late Fee
This allows you to drag and drop tenants between stages and assign tasks (like making a call or sending a letter).
🎯 Assign internal tasks for follow-up or escalate accounts to collections based on pipeline stage.
🔐 Step 7: Send Payment Confirmations Automatically
Once a payment is received (via Stripe, QuickBooks, or another tool), send an automated confirmation receipt.
✅ Confirmation Message Example:
“Hi {{contact.first_name}}, thanks for your rent payment of ${{custom.payment_amount}} for Unit #{{custom.unit_number}}. We’ve received it on {{today_date}}. No further action is needed.”
🎯 Use custom values for payment amount, date, and unit number.
You can also include:
- Next rent due date
- Receipt or transaction ID
- Support contact info
✅ Recap: Rent Collection System Overview
| Feature | Purpose |
|---|---|
| Branded Payment Page | Collect rent online securely |
| Workflow Reminders | Send automated rent notices |
| Tags & Fields | Track who paid and who hasn’t |
| Multi-Channel Alerts | Increase payment compliance |
| Pipelines | Visualize rent status by tenant |
| Confirmation Emails | Keep tenants informed post-payment |
| Integration (Stripe/Zapier) | Connect payments to your CRM |
By setting up an automated rent collection system in GoHighLevel, you ensure consistent cash flow, fewer late payments, and less stress for your team – while giving tenants a simple, user-friendly experience. ✅
Nurturing Tenants & Reputation Management
Your relationship with tenants shouldn’t end at lease signing. In fact, the most successful property managers know that tenant retention and reputation are everything.
By using GoHighLevel to nurture tenants and manage your reputation, you’ll build long-term trust, reduce turnover, and generate glowing reviews that attract more business – without adding extra admin work to your plate.
Let’s break it down: 👇
❤️ Step 1: Create an Automated Tenant Engagement Sequence
Tenant engagement shouldn’t stop after onboarding. Set up automated “touchpoints” throughout the lease to make tenants feel appreciated and supported.
📍 Go to: Automation > Workflows > New Workflow
🎯 Why tenants love this: It shows you’re proactive, responsive, and human – not just a rent collector.
🌟 Step 2: Automate Review Requests from Happy Tenants
Online reviews can make or break your property management business.
With GoHighLevel, you can automatically trigger review requests from satisfied tenants — and catch negative feedback before it goes public.
✅ Trigger review requests after:
- Maintenance request resolved
- Lease renewal
- 6 months of on-time payments
- Move-out (if positive experience)
🎯 Pro Tip: Use a two-step survey in GoHighLevel first:
- “How’s your experience? (1–5 stars)”
- If 4–5 stars → ask for public review
- If 1–3 stars → route to internal staff for resolution
📣 Step 3: Promote Positive Reviews Automatically
You can take the great reviews you collect and automatically showcase them on your website or social media.
✅ Options:
- Use a custom review showcase landing page in GHL
- Embed Google Reviews widget on your GHL website
- Add testimonials to email footers or rent reminders
🎯 You can even create a “Thank You” Workflow that sends a small gift (e.g. $5 Starbucks card) to tenants who leave a review – it’s a small price for lasting brand love.
🔍 Step 4: Monitor Tenant Sentiment Proactively
Track tenant sentiment using custom fields, tags, and forms in GoHighLevel.
✅ Examples:
- Custom Field: “Tenant Satisfaction Score”
- Tag:
At-Risk-Tenant - Notes: Log tenant complaints or praises
- Forms: Use regular feedback forms sent every 3-6 months
🎯 Add internal tasks when a negative comment is received:
“Follow up with Mark – reported noise issues in Unit 12B.”
🏠 Step 5: Build a Lease Renewal Nurture Campaign
Keep great tenants longer by sending renewal sequences well in advance of their lease end date.
📍 Workflow Example: Lease Renewal Campaign
🎯 BONUS: Add a quick poll – “Are you planning to renew?” with Yes/No buttons linked to custom forms.
💬 Step 6: Reputation Recovery for Negative Experiences
Not every tenant will be thrilled 100% of the time – but that doesn’t mean you can’t turn things around.
✅ Set up an internal alert workflow:
🎯 These extra steps show you care – and can turn 1-star reviews into raving 5-star loyalty.
✅ Recap: Tenant Nurturing & Reputation Framework
| Feature | Purpose |
|---|---|
| Engagement Workflows | Stay in touch with tenants all year long |
| Review Requests | Automate positive reputation growth |
| Feedback Surveys | Identify & fix problems early |
| Testimonial Pages | Showcase great reviews on your site |
| Renewal Campaigns | Increase retention with smart follow-ups |
| Recovery Automations | Catch and resolve tenant issues fast |
By using GoHighLevel to nurture your tenants and proactively manage your reputation, you’re not just avoiding problems – you’re building a brand tenants respect and owners trust.
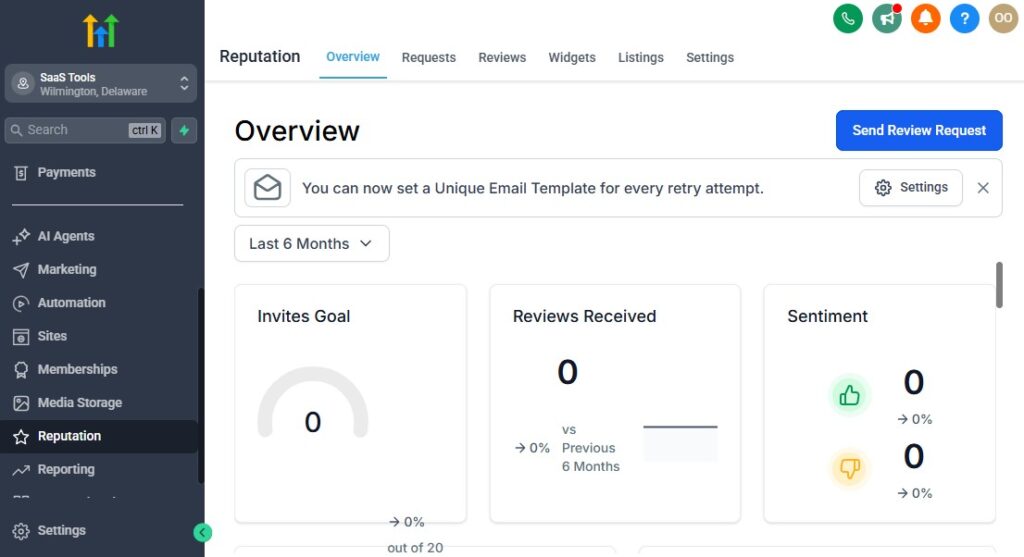
Reporting & Analytics for Property Management
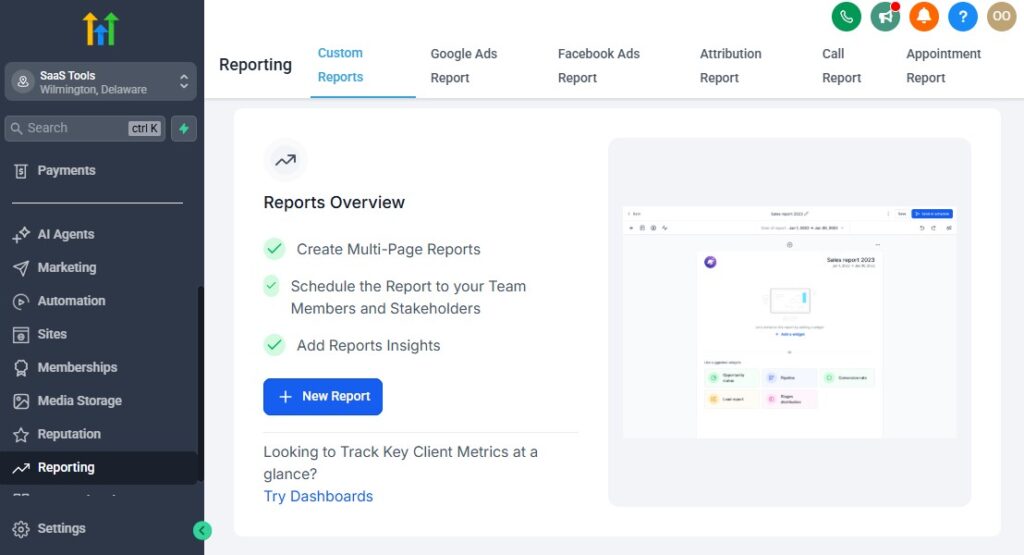
If you can’t measure it, you can’t manage it. And in property management, data is everything.
Whether you’re reporting rent collections, tracking occupancy, or showing owners how well their investments are performing – GoHighLevel gives you the tools to gather, visualize, and share critical insights.
In this section, you’ll learn how to leverage GoHighLevel’s built-in reporting tools, custom dashboards, and integrations to make better business decisions – and look like a rockstar to your clients. 🌟
🔍 Step 1: Know What You Need to Track
Before jumping into dashboards, get clear on the key metrics that matter in property management. Here are the most common:
✅ Financial Metrics
- Total rent collected (monthly/quarterly)
- Late payments vs. on-time
- Average rent per unit
✅ Operational Metrics
- Number of maintenance tickets opened/resolved
- Days on market per unit
- Tenant retention rate
✅ Lead Management & Marketing
- Total new leads per source
- Conversion rates (lead → tour → lease)
- Ad spend ROI
✅ Client Reporting
- Owner-specific reports (rent roll, expenses, turnover)
🎯 Tip: Create a checklist of KPIs for each stakeholder – owners, property managers, leasing agents, etc.
📈 Step 2: Set Up Custom Dashboards
GoHighLevel allows you to build custom dashboards tailored to your business model.
📍 Go to: Dashboards > Custom Dashboard > Create New
✅ Include widgets for:
- Opportunity stages (Leads → Signed)
- Monthly rent collection (manually updated or integrated)
- Maintenance task count (from Pipelines or Notes)
- Average response time (via support ticket tags or forms)
- Google Review rating widget
🎯 You can create separate dashboards for:
- Internal team
- Owners/clients
- Marketing performance
🧠 Step 3: Use Attribution Reports to Track Lead Sources
Want to know where your best tenants are coming from?
📍 Go to: Reporting > Attribution Report
✅ This tool helps you understand:
- Which ad campaigns drive the most lease conversions
- Whether Facebook, Google Ads, or organic search are bringing in quality leads
- What channels bring the highest ROI
🎯 Set up UTM parameters for each ad source and use GoHighLevel’s source tracking fields to match contacts to campaigns.
💬 Step 4: Share Monthly Owner Reports
Property owners want transparency. With GoHighLevel, you can automate professional, data-rich reports that build trust and reduce back-and-forth emails.
✅ Options for Owner Reporting:
Build custom reports using Google Sheets + Zapier, then send monthly summaries via GHL Email Workflows
Create a secure Client Portal using membership areas where owners log in to view:
- Occupancy rate
- Income & expenses
- Open maintenance tickets
Send automated monthly “Performance Emails” with stats pulled from CRM data
📩 Example Email:
“Hi {{owner.first_name}}, here’s your monthly update for April:
- Units rented: 4
- Rent collected: $12,350
- Maintenance requests: 2 (resolved: 2)
- Current occupancy: 96%
Click here to view the full dashboard: [link]”
🎯 Pro Tip: Use GoHighLevel’s Custom Values to dynamically populate emails with relevant numbers.
📤 Step 5: Export & Sync Data for Deeper Insights
If you need deeper reporting capabilities, you can export data or sync with other tools like:
- Google Sheets (via Zapier)
- Google Data Studio / Looker Studio
- QuickBooks Online
- Buildium / AppFolio (via Zapier or custom API)
🎯 Export tenant contact info, rent payment status, and maintenance history for end-of-year reporting or audits.
📌 Step 6: Automate Internal Notifications & Trends
Create internal alerts and trend-tracking using Workflows + Tags + Notes.
✅ Examples:
- Alert property manager if occupancy drops below 90%
- Tag tenants who pay rent late 3+ times
- Create weekly task summaries for maintenance staff
📍 Use “If/Else” logic to trigger smart workflows:
🎯 These little automations reduce surprises and keep your team proactive.
✅ Recap: Reporting & Analytics Made Simple
| Tool/Feature | Use Case |
|---|---|
| Custom Dashboards | Visualize KPIs at a glance |
| Attribution Reports | Track which marketing brings leases |
| Owner Updates | Monthly email reports, client portals |
| Google Sheets/QuickBooks | Advanced financial tracking |
| Internal Notifications | Keep your team informed & on-task |
With GoHighLevel, you’re not just collecting data – you’re turning it into action. From real-time dashboards to automated owner updates, you can run a more transparent, accountable, and high-performing property management business.
When you’re equipped with the right insights, you make faster decisions, keep stakeholders happy, and scale with confidence.
Learn More:
- What is GoHighLevel? (Features, Use Cases, Pricing & More)
- GoHighLevel Review: (My Experience After 5 Years)
- GoHighLevel Pricing: (+ Discount Codes)
- GoHighLevel Features: (Full List of Tools)
- GoHighLevel Onboarding Checklist: (Complete Tutorial)
- GoHighLevel for Small Businesses: (2026 Helpful Tutorial)
- GoHighLevel for Service Businesses: (2026 Helpful Tutorial)
- GoHighLevel for Local Businesses: (2026 Helpful Tutorial)
White-Labeling & Multi-Property Management
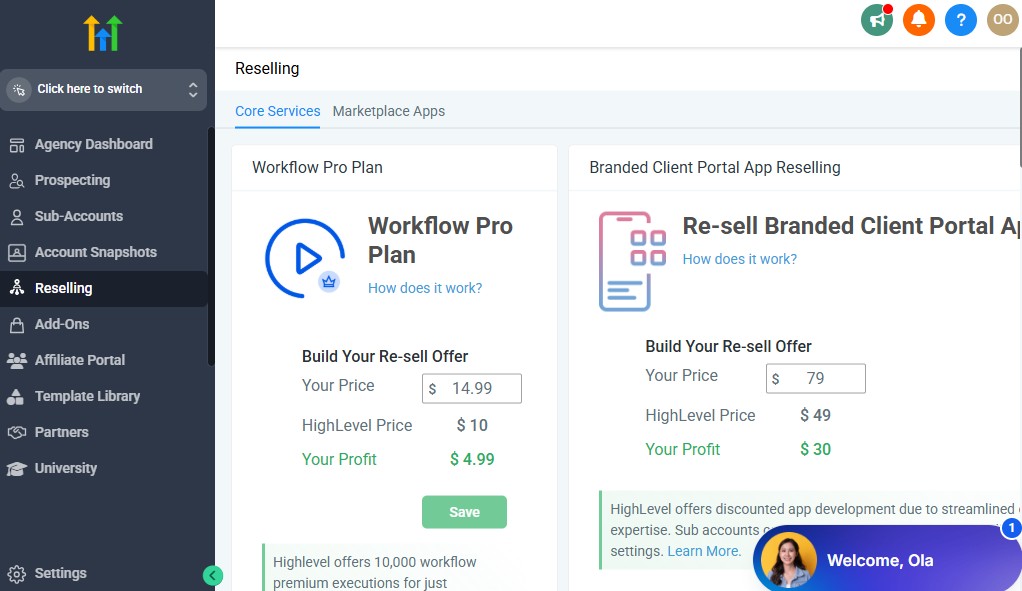
As your property management business grows, you need tools that scale with you – without sacrificing branding or operational control.
Whether you’re managing a handful of buildings or dozens of owners with unique portfolios, GoHighLevel gives you enterprise-level flexibility through its powerful white-label features and sub-account structure.
Let’s dive into how you can run multiple properties or brands seamlessly, all from one platform.
🎨 Step 1: White-Label the GoHighLevel Platform
Your clients and tenants shouldn’t see “GoHighLevel” anywhere – they should see your brand at every touchpoint.
✅ White-label Setup Includes:
- Custom domain (e.g. app.YourCompanyName.com)
- Branded login portal for tenants, owners, and staff
- Custom colors & logo in the dashboard
- Branded email/SMS sender profiles
📍 Go to: Settings > Company > Agency Settings
There, you can:
- Set your default logo and color palette
- Connect a custom domain
- Configure email/SMS sending (Mailgun/Twilio)
- Add branded favicon, dashboard name, and support links
🎯 Result: Every client and user sees your branding, not GoHighLevel’s – increasing professionalism and trust.
🗂️ Step 2: Use Sub-Accounts for Multi-Property or Multi-Owner Management
GoHighLevel’s sub-account structure lets you segment data, workflows, and users across multiple properties or owner portfolios.
You have two options:
✅ A. One Sub-Account Per Property
Best for: Managing individual apartment buildings, complexes, or HOAs with separate operations.
Each sub-account can have:
- Unique contacts (tenants)
- Custom workflows and automations
- Separate user logins (for property managers or maintenance staff)
- Branded emails specific to that property
✅ B. One Sub-Account Per Owner/Client
Best for: Managing multiple properties for the same investor/owner.
Each sub-account represents the client’s portfolio, giving you flexibility to:
- Provide access to their dashboard
- Segment tenants by building using tags or pipelines
- Offer a client portal experience with lease data, rent updates, etc.
📍 Go to: Sub-Accounts > Create New > Choose Template
🎯 Pro Tip: Create a Property Management Template Sub-Account with your workflows, pipelines, automations, and dashboard already set up – then clone it for every new building or owner.
👥 Step 3: Manage User Roles & Permissions
GoHighLevel lets you define custom user roles, so you can delegate without losing control.
Suggested Roles:
| Role | Permissions |
|---|---|
| Property Manager | Full access to tenant CRM, pipelines, automations |
| Maintenance Tech | View assigned tasks, access forms/work orders |
| Owner/Client | Read-only dashboards, performance reports |
| Leasing Agent | Manage lead pipeline, schedule tours |
📍 Go to: Settings > Team Management > Add User
You can also restrict visibility by:
- Pipelines
- Calendars
- Tags
- Sub-account level
🎯 This keeps sensitive info secure, while empowering your team to work independently.
🧱 Step 4: Create Shared Workflows Across Properties
Save time by creating master workflows that can be cloned or adapted across multiple sub-accounts.
✅ Use GoHighLevel’s “Import Workflow” feature:
- Build your ideal lead nurturing, rent reminder, onboarding, or maintenance sequence
- Export it
- Import into any other property sub-account with a few clicks
🎯 Use Custom Values like {{location.name}} or {{property_manager.name}} to personalize messages automatically by property.
📁 Step 5: Organize Assets for Multi-Property Use
As your account grows, so will your assets. Keep things clean by organizing your:
- Funnels (named by property or owner)
- Calendars (e.g., “Downtown Tours” vs “Suburban Leasing”)
- Pipelines (custom stages per property type or leasing process)
- Tags (e.g., “Tenant-Apt12B,” “Lead-WaterstoneApts,” “Owner-Jackson”)
🎯 This allows you to run tailored operations for each property while using one central system.
💼 Step 6: Offer White-Labeled Access to Owners
Blow your clients away by giving them access to their own live dashboard — fully branded and permission-controlled.
You can give owners:
- A login to their sub-account
- Access to reports only (no editing)
- Monthly overview emails pulled from the dashboard
Or create a Client Portal using GoHighLevel’s Membership Site:
- Secure login
- Pages for rent roll, service updates, announcements
- Embedded dashboards or uploaded PDFs
🎯 Looks like you built your own software – when in fact, it’s GoHighLevel under the hood.
🔁 Step 7: Streamline Recurring Operations at Scale
Once your structure is set, managing 5… 15… even 50 properties becomes repeatable.
✅ Create SOPs & systems like:
- “New Property Onboarding” checklist using tasks/workflows
- Auto-create calendar links, tags, templates when cloning sub-accounts
- Periodic workflows that run across all properties (e.g., holiday messages, policy reminders)
🎯 GoHighLevel becomes your operating system for property management at scale.
✅ Recap: Scaling Property Management with GHL
| Feature | Use Case |
|---|---|
| White-Label Portal | Brand every touchpoint for trust & professionalism |
| Sub-Accounts | Isolate properties or owner portfolios |
| Custom Roles | Delegate tasks securely |
| Shared Workflows | Reuse proven automations |
| Client Portals | Deliver transparency & elevate your service |
| Operational SOPs | Create a scalable system across all properties |
With white-labeling and multi-account management, GoHighLevel transforms from a CRM into your all-in-one property management platform – letting you scale smartly, serve professionally, and grow without chaos.
Frequenly Asked Questions
FAQs about GoHighLevel for property Management
Do I need technical skills to use GoHighLevel for property management?
🛠️ Not at all. GoHighLevel is designed to be intuitive. With templates, drag-and-drop builders, and visual workflows, you can automate and manage your business without coding experience.
Can I use GoHighLevel for both residential and commercial properties?
✅ Yes! GoHighLevel is highly customizable, making it perfect for residential rentals, commercial spaces, vacation properties, or even mixed-use portfolios.
What happens when I grow and manage 10+ properties?
📦 That’s where sub-accounts shine. You can create a scalable structure, assign team roles, and automate repetitive tasks – all while keeping everything clean, organized, and branded.
Final Thoughts
GoHighLevel isn’t just a CRM – it’s a complete operating system for modern property management.
Whether you’re a solo landlord, a growing property management company, or managing portfolios for multiple owners.
GoHighLevel empowers you to:
- Streamline lead generation
- Automate communications and tasks
- Manage bookings, maintenance, and payments
- Deliver stellar client and tenant experiences
- Grow your brand – all in one place
Now that you’ve seen how to use GoHighLevel for property management from A to Z, it’s your turn to build, automate, and scale.
👉 Start simple. Stay consistent. Automate where it matters. And let your system work for you.